Thursday, April 1, 2010

Add Your Blogger Blog to Facebook

In today's Blogger tutorial I will show how to add your Blogger blog (Blogspot blog) to Facebook so that your updated content can be read right from your Facebook profile. Importing your Blogger blog into Facebook will only take you a few minutes to set up but will likely produce quite a few extra readers.

By importing your blog into Facebook your Blogger posts become available to all your Facebook friends and family. Everytime you post new articles to your Blogger blog they will automatically appear on your Wall in Facebook and in your friends News Feeds. It is also possible to remove any content that you do not wish to be displayed which may be handy for some.

Advantages of Importing Your Blog into Facebook
  • Increase your web presence
  • Enjoy added interest in your blog articles and new readers
  • No need to replicate your blog articles or content on Facebook

Disadvantages of Importing Your Blog into Facebook
  • If you blog for profit think carefully about importing your Blogger blog into Facebook as you are likely to experience a drop off in traffic and a reduction in revenue earnings as fewer people will visit your actual blog. One possible way around this is to set your blog's RSS feed to show summaries only that way ensuring that anyone interested will need to visit your blog to read the whole article.

How to Import or Add Your Blogger Blog to Facebook
  1. Login to Facebook or Sign up to Facebook if you are not already a member
  2. From your Facebook profile page go to Settings > Application Settings which you will find in the top right hand corner

  3. Select Notes from the list of applications displayed on the page
  4. Click on Import a Blog in the right sidebar

    Facebook - Add Notes Screen (Settings, Applications Settings, Notes)
  5. Enter the URL address of your blog

    either website URL: http://blogknowhow.blogspot.com

    or your Blogger feed: http://blogknowhow.blogspot.com/feeds/posts/default?alt=rss
    Please note it is not necessary to add the feed of your blog as Facebook will autodetect this
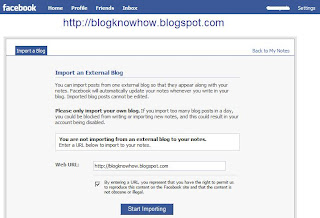

    Facebook - Import a Blog Screen
  6. You will need to tick the box below this to confirm that the content is not illegal or obscene and that you have the right to permit Facebook to reproduce the content of your blog. Any problems click Cancel and reenter your blog URL address
  7. Click Start Importing
  8. Facebook will now import your feed and you will be taken to a preview screen to make sure the content matches your blog. If it does go ahead and confirm the import by clicking on the Confirm Import button
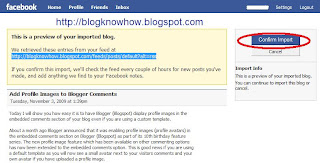
    Facebook - Preview Screen for import a blog showing latest content
  9. Go to your Wall in Facebook to check that your Blogger posts are now available to all your Facebook friends and family.

Tips and Troubleshooting
  • If your Blogger blog is members only the blog import will fail as Facebook will be unable to detect your blog's feed
  • To remove a blog post from your Wall in Facebook click on the Remove button on the righthand side
  • If your images are not displaying (there seems to be a bit of a glitch with this) then you may need to try importing your blog using Networked Blogs


In this Blogger tutorial I have discussed how to import your Blogger blog into your Facebook profile. I have also pointed out some advantages and disadvantages of adding your Blogger blog to your Facebook profile. I will be talking some more about importing blogs into Facebook in the future which is likely to be of interest to those with multiple Blogger blogs.

Labels:

Wednesday, March 31, 2010

Add a Tweet It or Retweet Button to Your Blog

Log in to Blogger, go to "Layout" -> "Edit HTML" and mark the "Expand Widget Templates"


Find (CTRL+F) this code in the template:


<div class='post-header-line-1'/>
And immediately BELOW/AFTER that, paste the code for the widget

Here's the code for this widget:

<script type="text/javascript">

tweetmeme_url = '<data:post.url/>';

tweetmeme_source = 'YOUR_TWITTER_ID';

</script>

<script type="text/javascript" src="http://tweetmeme.com/i/scripts/button.js"></script>
Replace "YOUR_TWITTER_ID" with your own Twitter profile, in the code above.


And it will be displayed like this:


To show these widgets only in published post pages and NOT in homepage, add the code like this:

<b:if cond='data:blog.pageType == "item"'>

CODE FOR TWEET WIDGET

</b:if>

Labels:

Add Facebook Buttons To Your Blog

Log in to Blogger -> Layout -> Edit HTML, and select the tickbox "Edit Widget Templates"

Now find this code in your template:


<div class='post-header-line-1'/>

Now immediately below it, paste the code for the facebook button (select the appropriate one for your blog).


As a link:

Add Facebook link to your blog

Code to paste:

<!--FB-BUTTON-STARTS--><b:if cond='data:blog.pageType == &quot;item&quot;'>


<span style="text-align: right;">

<a name="fb_share" type="icon_link" href="http://www.facebook.com/sharer.php">Share</a><script src="http://static.ak.fbcdn.net/connect.php/js/FB.Share" type="text/javascript"></script>

</span></b:if><!--FB-BUTTON-STOPS-->


Button #1


Add Facebook link to your blog

Code to paste:

<!--FB-BUTTON-STARTS--><b:if cond='data:blog.pageType == &quot;item&quot;'><span style="text-align: right;">

<a name="fb_share" type="button_count" href="http://www.facebook.com/sharer.php">Share</a><script src="http://static.ak.fbcdn.net/connect.php/js/FB.Share" type="text/javascript"></script>


</span></b:if><!--FB-BUTTON-STOPS-->


Button #2

Add Facebook link to your blog

Code to paste:

<!--FB-BUTTON-STARTS--><b:if cond='data:blog.pageType == &quot;item&quot;'><span style="text-align: right;">


<a name="fb_share" type="box_count" href="http://www.facebook.com/sharer.php">Share</a><script src="http://static.ak.fbcdn.net/connect.php/js/FB.Share" type="text/javascript"></script>

</span></b:if><!--FB-BUTTON-STOPS-->

Labels:

Add Google Buzz Buttons To Blogger/BlogSpot Blogs

G-Buzz, although Google has not yet provided any official "Buzz It!" buttons, but it does allow you to synchronize your blog-feed with the Buzz, so that all your posts are directly sent to your Buzz account.

Here's how you can add these buttons to your blog:

STEP #1
Log in to Blogger, go to Layout -> Edit HTML
and mark the tick box "Expand Widget Templates"

Now, find this code in the template:

<div class='post-header-line-1'/>


STEP #2
And immediately BELOW/AFTER it, paste this code:

<!--BUZZ-STARTS-->

<a expr:href='&quot;http://www.google.com/reader/link?url=&quot; + data:post.url + &quot;&amp;title=&quot; + data:post.title + "&amp;srcTitle=" + data:blog.title' target='_blank'><div style='border:0px !important;text-align:right;margin-top:-42px;'><img alt='Buzz It' src='http://i46.tinypic.com/121wg9e.jpg'/></div></a>


<!--BUZZ-STOPS-http://infobitez.blogspot.com/-->

It will display a small Buzz It! button like this:


Or, paste this code:

<!--BUZZ-STARTS-->

<a expr:href='&quot;http://www.google.com/reader/link?url=&quot; + data:post.url + &quot;&amp;title=&quot; + data:post.title + "&amp;srcTitle=" + data:blog.title' target='_blank'><div style='border:0px !important;text-align:right;margin-top:-42px;'><img alt='Buzz It' src='http://i47.tinypic.com/2j0b02c.jpg'/></div></a>


<!--BUZZ-STOPS-http://infobitez.blogspot.com/-->
to display a larger Buzz It! button like this one:


NOTE: By default, the alignment of these buttons is kept to "Right", you may change it to "Left" too. To change the position of the button, change the value -45 pixels (in margin-top:-42px;).

STEP #3
Save the template and let the Buzzer Buzzzzzzz...

A new javascript based code to display these G-Buzz buttons; wherein if the readers select any part of the post before hitting the Buzz This button, then the selected text (and images too) will also appear in their G-buzz updates. Here's the new code:


<a href='javascript:var%20b=document.body;var%20GR________bookmarklet_domain=&quot;http://www.google.com&quot;;if(b&amp;&amp;!document.xmlVersion){void(z=document.createElement(&quot;script&quot;));void(z.src=&quot;http://www.google.com/reader/ui/link-bookmarklet.js&quot;);void(b.appendChild(z));}else{}' title='Buzz It!'><div style='border:0px !important;text-align:right;margin-top:-42px;'><img alt='Buzz It' src='http://i47.tinypic.com/2j0b02c.jpg'/></div></a>


PS: Use this code, instead of the one from STEP #2, if you want those additional benefits. The above code will display the larger icon by default, change the image-url to show the smaller icon.

Labels:

Tuesday, March 30, 2010

Fix Firefox Does Not Save, Store or Remember Password On Some Sites Permanently for Always Auto-Complete

Firefox web browser has built-in password manager
that able to save, store or remember user name, ID and password credentials to auto-fill and auto-complete the login or logon text fields on next and subsequent visits. However, on some sites, Firefox, including both Firefox version 2 and Firefox 3, fails or does not prompt and offer user a choice to remember and save the password, and hence won’t store the password for AutoComplete or AutoFill.

Here’s the trick to make Firefox ignore all disabled or turned off AutoComplete request by websites, such as PayPal, Yahoo!, email services, Internet Banking, and many other secure sites, so that the browser will offer user a choice to remember or save the password or not permanently. Again, the hack only works on websites that use “AutoComplete=Off” parameter to disable the password saving feature in web browser.

To permanently enable user ID and password Auto Complete on all websites and web pages regardless of website setting, go to C:\Program Files\Mozilla Firefox\components folder, and edit the nsLoginManager.js file.

Locate the following lines of code (around line 725 to 727 in Firefox 3), and the comment out the lines by adding // (double slash) in front of the lines.

Before:
if (element && element.hasAttribute("autocomplete") &&
element.getAttribute("autocomplete").toLowerCase() == "off")
return true;

After:
// if (element && element.hasAttribute(”autocomplete”) &&
// element.getAttribute(”autocomplete”).toLowerCase() == “off”)
// return true;

After editing, save the file and restart Firefox browser, and now all passwords can be saved.

Labels:

Saturday, March 27, 2010

How to Upgrade Wordpress in less than 10 Seconds

Upgrading Wordpress can be a major pain (if you don’t know what you’re doing).

The typical update path would either use the built in wordpress upgrade function (which doesn’t work for all server setups) or something like:
  1. Visit wordpress.org
  2. Download the latest zip file to your pc
  3. Unzip the latest file
  4. Fire up your FTP program
  5. Connect to your server
  6. Navigate to your blog folder
  7. Upload the new Wordpress files
  8. Wait 5+ Minutes for the files to upload one by one
  9. Visit the upgrade page on your Wordpress Blog
  10. Finished!
Doing the above could take 15-20mins or more. So how can we do it in less than 10 seconds? Easy, via the command line.

How to Upgrade Wordpress from the Linux/UNIX command line

Log into your shell account & replace /var/www/ with the folder that your blog resides in (i.e. home/blog/public_html).

1.tar -zcvf /var/www/wordpressbackup/120809.tar.gz /var/www/blog
2.mkdir /var/www/tmp
3.cd /var/www/tmp
5.unzip latest.zip
6.cd /var/www/blog
7.cp -avr /var/www/tmp/wordpress/* .
8.rm -rf /var/www/tmp/wordpress /var/www/tmp/latest.zip

So, looks simple eh? Lets have a look at what these commands do:
  1. Takes a backup of your current Wordpress installation (change the date to the current date)
  2. Makes a new directory called tmp
  3. Changes to the tmp directory
  4. Grabs the latest wordpress zip file
  5. Unzips the wordpress zip to the tmp directory
  6. Changes to the blog directory
  7. Copies & replaces everything in your wordpress directory with the new files
  8. Removes the tmp directory & the zip file

Caveats

There are a few issues with this method that you should be aware of before trying yourself.
  • The folder that your blog sits in will be different then /var/www/blog/ so make sure you change this.
  • The commands overwrite existing files but it do not delete legacy or discontinued files
  • Make sure you backup your directory & mysql database just incase your make any mistakes

Labels:

Monday, March 22, 2010

Difference between 32 bit and 64 bit OS

During my research about 64 and 32 bit operating system I found many people confused about what computer they should purchase or what bit system they should choose…I think this article should be a great help for people to choose the correct machine for their use.

I found many people asking about that what is the difference between 32 and 64 bit operating system?... I hope after reading this article people would feel free to choose the best machine for them.

A 32 bit processor is faster than a 64 bit processor, 64 bit processors are very commonly used that you can find it easily in any home pc but the main difference is the hardware you are having on your machine. For 32 bits there isn’t any need of any wide main bus to carry 32 bits at a time but for 64 bits its must that you should have a wider bus to carry 64bits.

The main difference between a 32 bit and 64 is that 32 bit system has 4gb(gigabytes) of space for addressing means that the 32 bit system has a limit of 4GB RAM to process data where as the 64 bit operating system has 2^64 bits of space to address and supports 16 hexabytes of RAM to process data.

A person who does not care about the category will find 64 bit more beneficial than 32 bit because he can use 64 bit OS with 32 bit Os and softwares. If we compare 64 bit with 32 bit OS, 64 bit is faster and performs more upgraded silicon processes and have more no of transistors which proves it to be more advantageous than 32 bit.

Now most of the software companies are developing their softwares in accordance to the 64 bit environment, it’s really hard for the consumers to run a 64 bit application in 32 bit environment, in this case they have to upgrade their hardware’s such as RAM which is also a big issue because most of the computer users have less than 1Gb in their systems.

So instead of changing your hardware day by day I would recommend d32 bit OS which is more user friendly and enables it users to run applications of 64 bit in 32 bit environment.

Labels:

Top 5 Most Used Text Editors

As time goes by, the variety of text editors available for the use of web developers keep on increasing. It is always that the new one has something better or something new to offer. Good thing that due to the number of choices they have, they could weigh which one would be most appropriate for their project.

Here are the most used text editors by web developers:

Notepad

Notepad is the most popular text editor based on the survey. It does not support any format or styles, which makes it very suitable in a DOS environment. It is one of the most favorites because it recognizes both left to right and right to left languages. It also does macro-recording and playback for repetitive keystrokes, a powerful regular expression search-and-replace, and support for many programming languages. Although you can edit file using notepad no matter what the format is, it does not read UNIX or MAC-style text files accurately.

Textmate

Textmate is a GUI text editor for MAC OS X. It is commonly used for screenwriting. Programmers prefer Textmate because it features declarative customizations, tabs for open documents, recordable macros, folding sections and snippets, shell integration, and an extensible bundle system. On the other hand, it does not support variable-width or wide fonts, right-to-left languages, (S)FTP, split views and textmate tends to work slower when composed with large files or long lines. Developers must also be online to be able to validate their website because only W3C validator can be used for HTML validation.

Coda

Coda was specifically developed for MAC OS X. It was created to resolve the problem of inadequacy of full-featured website development platforms corresponding to application development platform Xcode. One of its notable feature is that it boasts a new Find/Replace mechanism. It benefits the users because they were able to do complex replaces using a method similar to regular expressions. It also supports bookamarks, which are the specially-formatted comment tags in many syntaxes. With the use of bookmarks, developers can go to the corresponding line of text from anywhere in the editor by clicking on the link in the Code Navigator.

Vim

Vim is compatible with Windows, Linux and MAC OS. It is based on commands given in a text-user interface. The command line mode is where its full functionality takes place. Some considers it as a programmer's best friend because it is very convenient to use and it is very extensible. Programmers are not the only ones who benefit from this text editor, but also the children of Uganda. Although Vim is free and open source software, its license has charityware clasuses.

PSPad

PSPad is a freeware text editor for Windows. It supports syntax highlighting and hex editing, and is designed as a universal GUI for editing many languages including PHP, Perl, HTML, and Java, autocompletion, tabs, FTP client and find/replace using regular expressions. It also has a feature where you can save sessions to be able to go back to your previous set. up.

When choosing the proper text editor to use for your project, it shouldn't depend on the popularity of the program. It will all boil down to the usability and functionality of the product.

Labels:

Saturday, March 7, 2009

ADMIN HACK !!Install anything without administrator permission(eg:Internet Cafe)

First Download

Just right click on the start up menu button n explore!!!


then go to prevent access to drives(its just below it) disable it to......then u can acces the drives 10000%....

go to user configuration-admin--templates-windows components-windows explorer-hide specified drives(disable this)

Labels:

Friday, March 2, 2007

Registry Editing Has Been Disabled By Your Administrator


You get this error mostly when your computer is infected with virus, trojan, or piece of spyware. Sometimes administrators may place restrictions on using the regedit command to keep others from changing things on computers.

There are different ways to enable Regedit. Here i'll show you two simple ways to enable it.

Method 1:  
Using Group Policy editor.
Go to Run –> gpedit.msc
In the left hand menu, go to User Config –> Administrative Templates –> System.
Now In the right hand pane, select “Prevent access to registry editing tools”.  Double click and Select Disabled or Not Configured and choose OK. and Done.
Restart your system.

Method 2
Go to Start –> Run, copy and paste the follow in the Run box and press OK.

REG add HKCUSoftwareMicrosoftWindowsCurrentVersionPoliciesSystem /v DisableRegistryTools /t REG_DWORD /d 0 /f

Restart your system.

Labels:

Task Manager Has Been Disabled


To enable Taskmanager follow the steps below

Method 1:
Using the Group Policy Editor in Windows XP Professional

              Click Start, Run, type gpedit.msc and click OK.
              Under User Configuration, Click on Administrative Templates
              In the left pane double click System, then on Ctrl+Alt+Delete Options
              Find Remove Task Manager and double click it
              Choose the option "Not Configured"  and click Ok.
              Close the Group Policy Window.

Method 2:  Using Run command
                  

   1.      Click on Start, Run and copy paste the following command exactly and press Enter

REG add HKCU\Software\Microsoft\Windows\CurrentVersion\Policies\System /v DisableTaskMgr /t REG_DWORD /d 0 /f


Labels:

Tuesday, February 27, 2007

Choosing a pc monitor for home

When you come to a store with LCD monitors, the first thing you see is lots and lots of different nice-looking LCD monitors. Modern LCD-screens are made in various designs – from high-tech to classic. But you will definitely not find it hard to choose a color, as there are not many options – just black or silver, or combination of these colors. Silver and black have become classic for equipment. Besides the look, there are also many technical features, which make a difference in the market of LCD monitors. Monitors differ in prices so much, first of all because of the quality, warranty and support. Classes also play an important role in the pricing strategies of producers. The higher the class of a monitor is, the better colors and sharper image it will display.
 
One of the most important issues, when buying an LCD monitor is the size, especially now, when it became possible to use an LCD TV as a monitor. So which one to choose, 17", 19", 20" or even 24"? Or get a TV-size monitor from 26" up to 65". In this case you can know for sure, that the bigger monitor you get, the better will be your experience from watching movies and playing games on it. But at this moment, we come to the issue of placement. If you are going to put an LCD-monitor on your desk, you have to make sure it fits and leaves enough open space for other devices, thus you might not be able to get the biggest monitor. The quality of picture is not only affected by the size of your LCD monitor, but also by your video card. So if your video card is weak, then you should not buy a big screen, as the videos will look like a slideshow.


Each monitor will have a number of qualities, according to which you can compare monitors, and find the right one for you. The first thing to consider is the native monitor resolution, which is the number of pixels in a monitor. It is usually indicated in product description of any monitor. If you use native resolution, the quality of picture will be perfect, and the image will not get blurred.

It is also quite hard to decide, whether to choose a wide-screen or a square monitor. With a widescreen monitor you will be able to enjoy brand new widescreen movies without seeing the annoying black bars on top and bottom of the image. People, who mostly work with multimedia, use widescreen monitors. Square monitor is considered better for use in an office, which is much more convenient for work with majority of Microsoft office programs. As for gamers, they should be aware, that many of the older games will not go well on the new widescreen monitors and will be stretched. Some newer versions of widescreen LCD monitors have a very interesting feature, which completely eliminates all disadvantages of widescreen monitors, compared to the squared screens. Some of the new widescreen monitors have the feature of rotation, which allows rotating monitor by 90 degrees and this way show Microsoft Word documents at their natural size, just like on paper.

When choosing between digital and analog (DVI and VGA), rely on your video card. Whichever format is supported by your video card should be chosen by you, when buying a monitor. The cheaper monitors are usually those with VGA connectors, but it is possible to find combined (for both VGA and DVI formats) versions at a medium price. DVI format is gaining very strong positions in the market right now, thus, it’s smarter to upgrade video card to DVI, in our opinion.

The cheaper options of LCD monitors are also defined by the contrast ratio. Contrast ratio of an LCD monitor is the way the colors are displayed on it. When contrast ratio is high (700:1), you can be sure that black is actually black, no dark grey, like with monitors, having lower contrast ratio (400:1). Some monitors claim to have dynamic contrast ratio, which is a sign of cheating customers. Such kind of contrast works poorly and can only fool your eye. You will see the high contrast ratios in the product description, but it will not be the actual contrast ratio you will get, when watching a movie on this monitor.

A response rate is another highlight, especially for gamers. When the LCD monitors were invented, they didn’t become very popular because of the blurring effect (as the response rate was around 24ms). Modern monitors have 8ms response rate or better, which means that all motions on such monitors appear clear and natural. The best monitors for gaming will have response rate at the level of 2 to 3ms.


Labels: