Pinpointe Best Email Marketing For Companies | Review
In this tutorial cum review, I want to introduce one Email Marketing Customer Relationship Management (CRM) to the world that can assist business people in creating a strong relationship with the customers.
What is Pinpointe?
Pinpointe is a California based company that offers advanced email marketing for multi-site businesses, franchises, universities, and others. Pinpointe is not a complete CRM like Hubspot, but it packs some serious features and support that is suitable for all sized businesses. The premium packages start from $49 per month, 5,000 contacts, and 75,000 monthly emails send limits. You have a Drag & Drop email template builder and tons of advanced sending options.
1) Add Multiple Accounts for Team or Clients
Pinpointe allows account owners to set up multi-tier accounts for the team. The account owner can set up one account for the team or multiple accounts and up to 500+ accounts. The account administrator has the power to assign an appropriate role to the newly added account, and let me give you a glance of it.
Step 1: Highlight your mouse cursor on the user icon, and then click on “Account Settings” to continue.

Step 2: Now, select “Manage Users” from the top menu.

Step 3: A window will show up on the screen and fill up the empty fields with team members’ details.
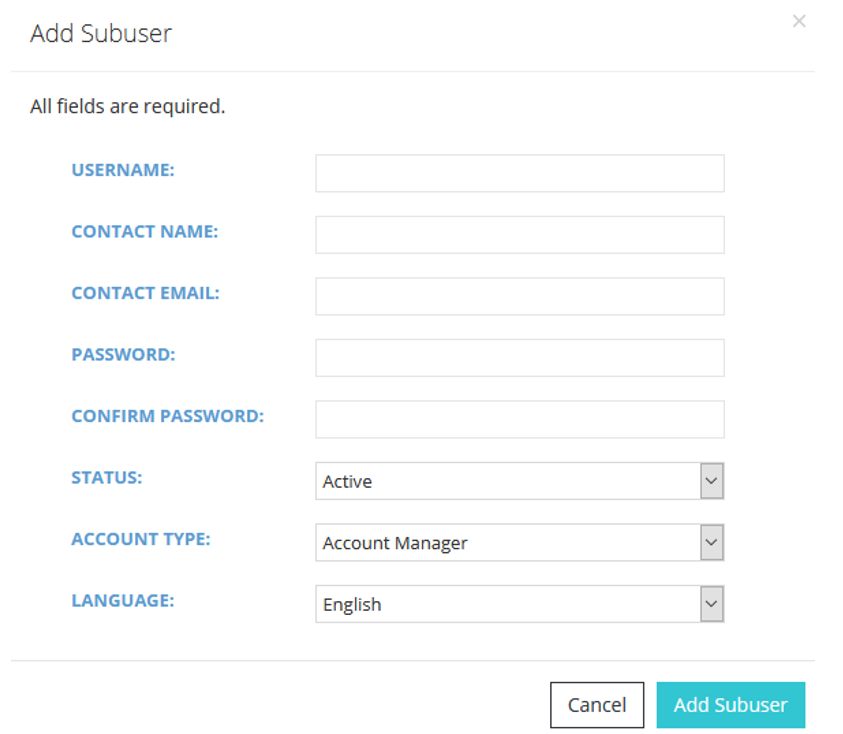
Step 4: I have filled up the empty blanks with information.
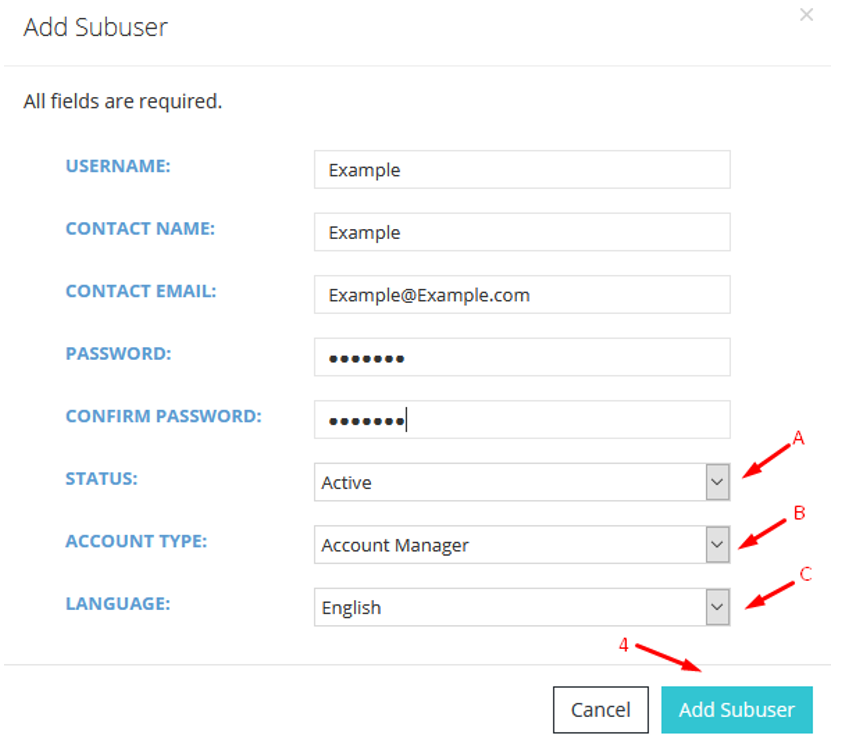
- You can control account status.
- Give the team members appropriate roles.
- Select the native language.
Once, you have finished adding details and then click on “Add Sub-user” to add a team member.
2) Add Team members & Client’s to the account
Add multiple team members to the account, and give them appropriate roles to manage the specific client. The account owner or administrator has the ability to add & remove clients to the account and give them enough privileges to add their own team members using a dedicated cloud system. Allow me to guide the readers to add team members in the Pinpointe account.
Step 1: Click on the account icon, and then click on “Account Settings” to continue.

Step 2: The account settings page shows up on the screen and click on “Manage Users” and then select “Add User” to begin the process.

Step 3: A small window will pop-up on the screen and start filling up the user information.

Step 4: The account owner has the power to revoke access to the account using the “Status” feature. The “Account Type” allows the account owner to give proper roles to the team member. Once, you have filled up the empty blanks and then click on “Add Subuser” to complete the process.

More options will appear in “Account Type” when you are running campaigns, and you will be able to give multiple users a different set of roles.
3) Pinpointe Interface
I mentioned above that the official developers were working for years to provide a user-friendly interface for beginners that have little to no technical knowledge. Even I had some speculations at the beginning, but I have tested the functions and found out that it consumed 10 minutes to understand the interface. I consider demonstration an important part to explain my point, so let me show you how you can start working on the email template.
Step 1: Login into the account from the homepage and this is where you will land. Click on the “Email Campaigns” for the drop-down menu, and then select “New Campaign” to start the process.

Step 2: Now, select one editor from the list.
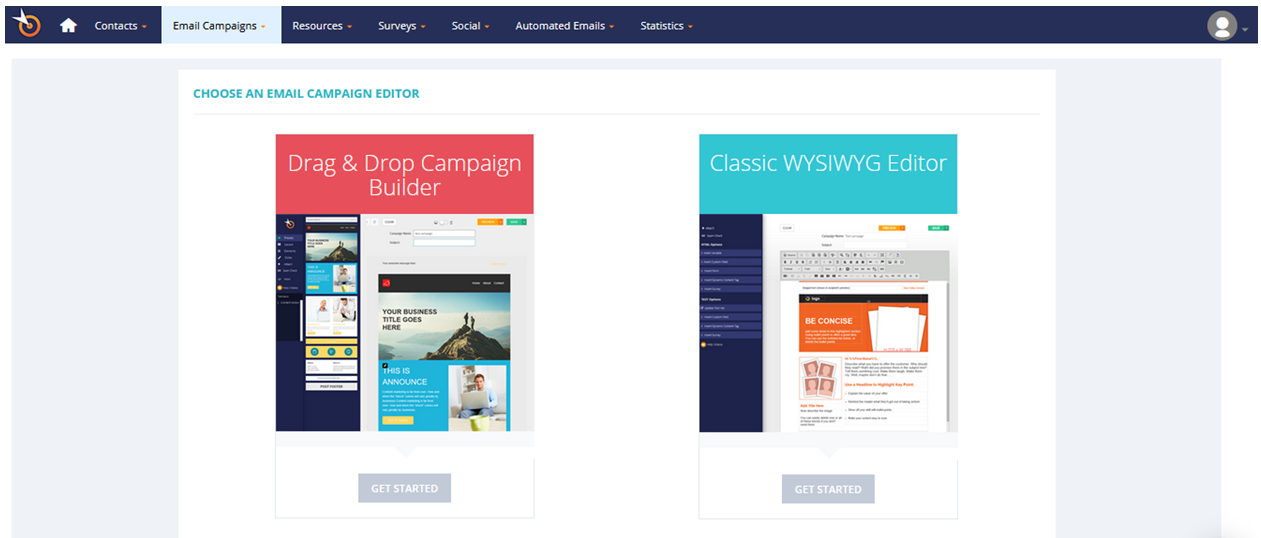
Drag & Drop Campaign Builder (recommended): This is a modern builder that focuses on automation.
Classic WYSIWYG Editor: Edit the email template using the classic editor and this focuses on programming.
Step 3: Select one pre-prepared template from the list. Add campaign name in the empty field, and then click on “Create” to continue.
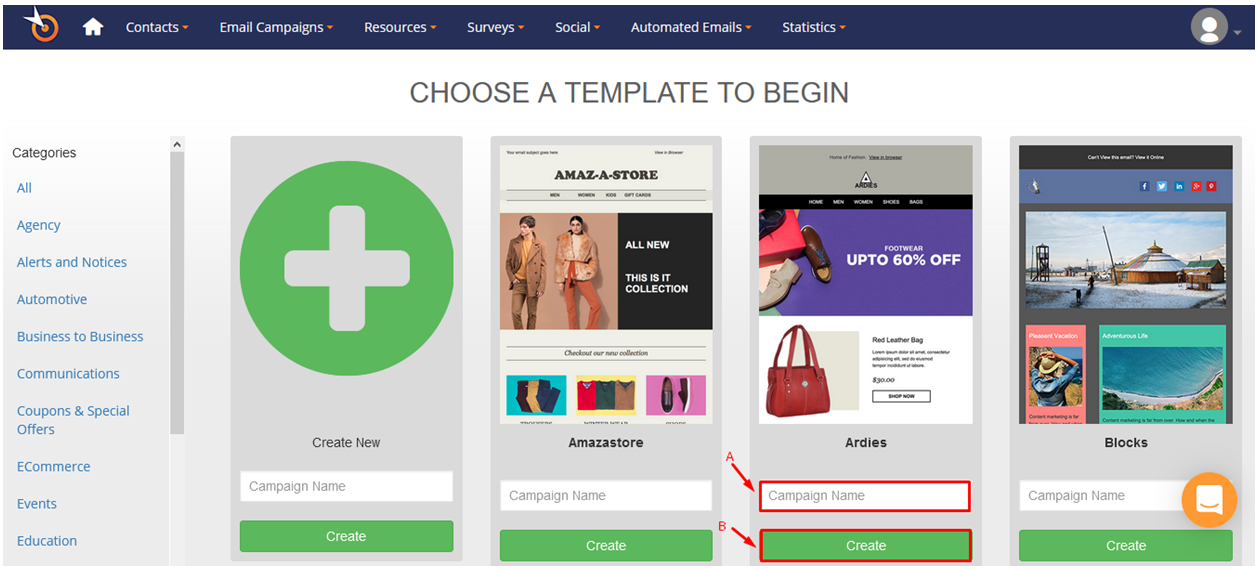
Step 4: Start editing the template to attract new customers on the platform.
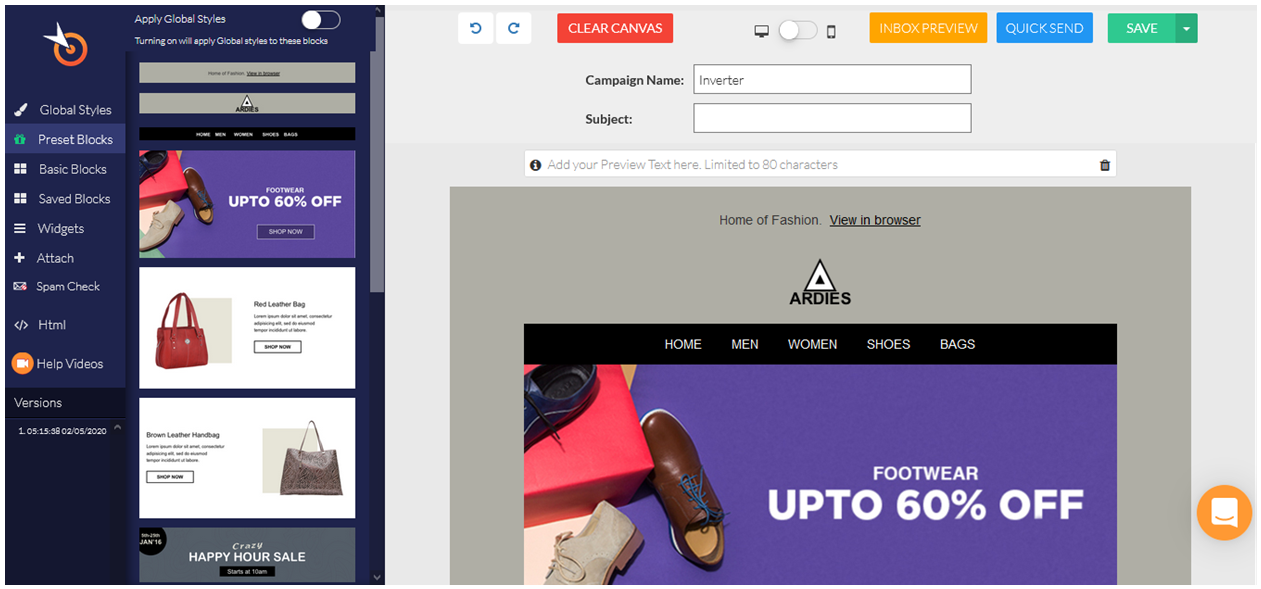
There are several options available in the editor and spend some time understanding the options. I have already explained the main functions below, so don’t miss out on one single point.
4) Modern Email Builder
I was introduced to the email builder a few months back, and I was slightly intimidated by the interface because everything looked complicated. I started to spend a few minutes in the builder and realized that I needed to work on the template for a few minutes to master the interface. Let me break down a couple of important things and help you master the interface.
Global Styles:
In the Global Styles, you can change the background color, background image, body-color, title color, adjust the size of texts, increase or decrease spacing of the entire template, and make adjustments to the template. Overall, you can make changes and it will apply to the entire template.
Element Customizations:
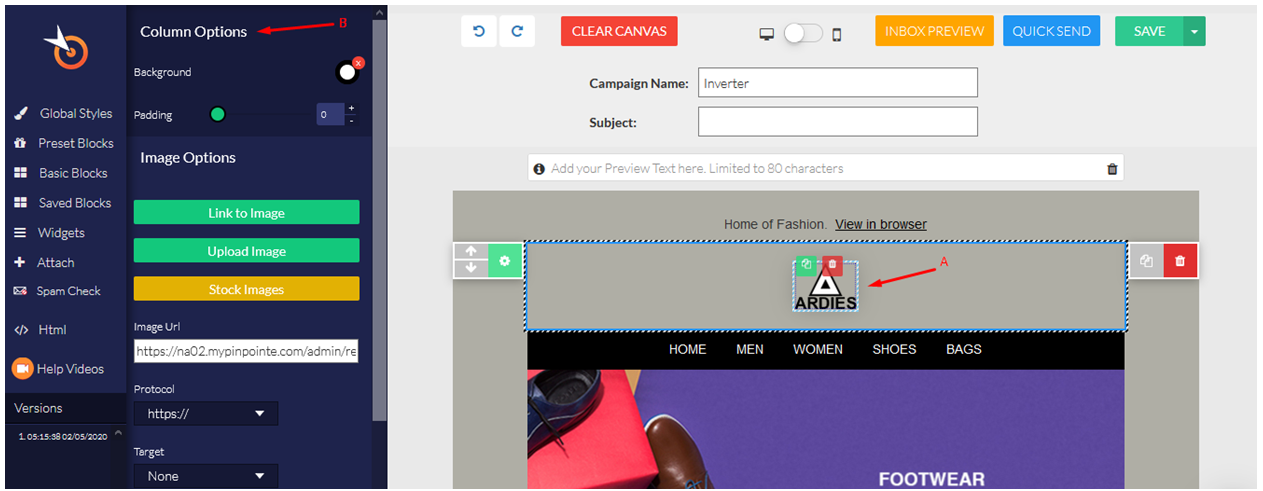
I want to edit every single element in the template manually, and one-click will enable the editing panel on the left side. I selected the logo because that’s where we start working on the project, and I can do several things. Add a new link to the logo, upload an image to replace the existing one, pick one image from royalty-free stock images, and more.
Quick Toggles:
I consider quick toggles life savior, where I didn’t have to go through plenty of mess that I created earlier. You can undo recent action or re-do recent action, clear canvas, design preview (desktop, mobile, inbox preview), saving functions and more.

Pinpointe Email Builder Features:
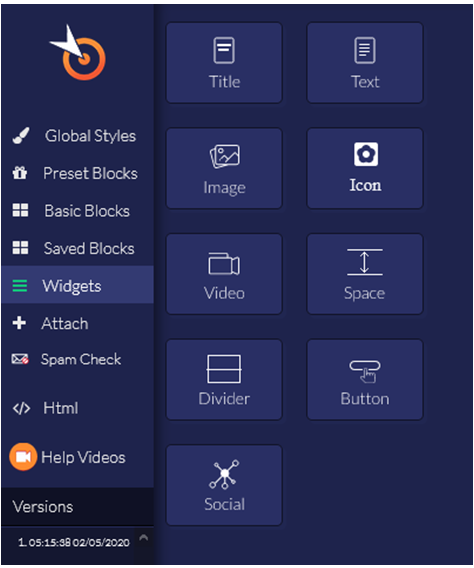
I mentioned three important functions that I found because that’s what helped me to solve my problem. However, I request the readers to focus on other features because they come in handy when you want to add specific elements quickly in the desired spot. The widgets allow the designers to add elements such as image, video, button, etc. I won’t explain more options further because I want the readers to try them personally.
5) Custom Fields
Professional people in email marketing target specific contacts or recipients and custom fields come in handy. Uploading a new database to the Pinpointe web-application does not require (Contacts > Manage Database (s) > New Contact Database) additional knowledge, but you can send emails to specific contacts, and you can determine them by using custom fields. You can add new custom fields from the dashboard, and while adding new contacts in the database, and Pinpointe added relevant custom fields in the latest update.

6) Advanced Sending Options
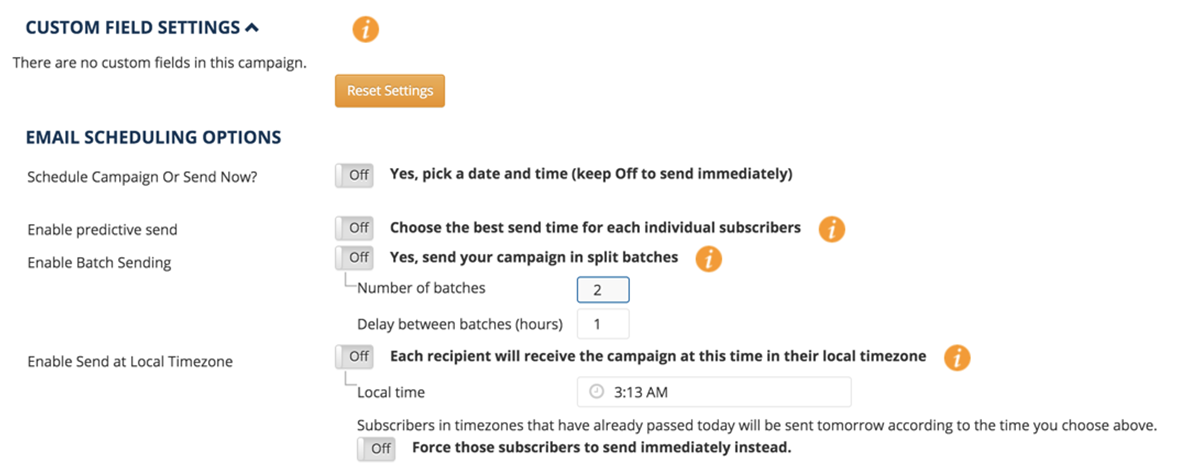
I don’t want to brag about the Pinpointe features, but I must say that they provided advanced features in the market today. You can add the custom fields here to send business emails to those, whom you are targeting. In the email options, you can select the time of sending, send emails to recipients based on their local time, send the emails in batches, and more.
7) Analytics
Analytics is a core feature for professionals, who are aiming to reach the recipient’s goals and understand who cares about their products. I will give you a simple introduction to the analytics page, and provide in-depth information on it.
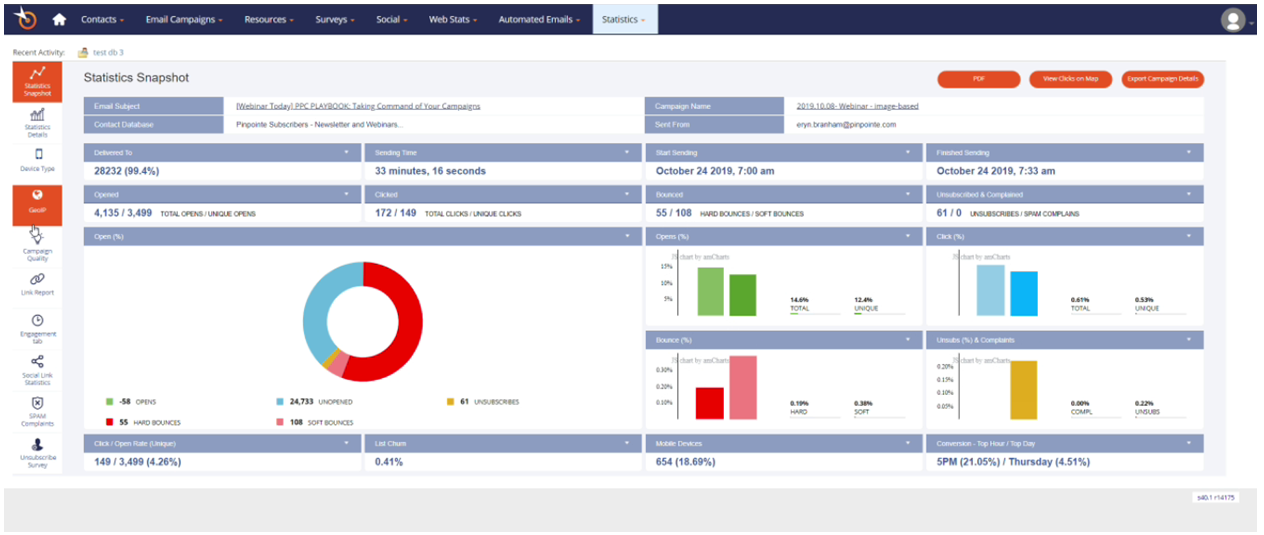
Statistics Snapshot:
Take a quick look at the demo account snapshot, where you can learn about the performance of the recent campaign and older campaigns in one place. I spoke to the Pinpointe team, where they have informed me that this section is going to have a real-time statistics page.
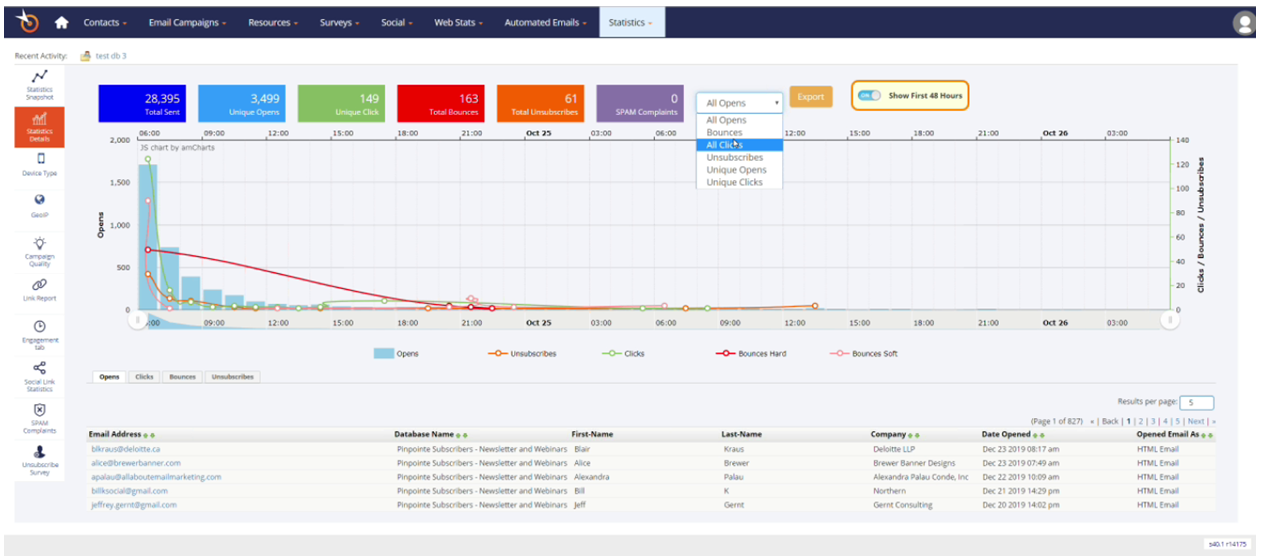
Statistics Details:
Learn about the campaign reactions from the recipients and you can find out how many people clicked the button, how many responded, and more. Learning about the unsubscribed recipients gives us in-depth information on what they do not like, and what they are following instead.
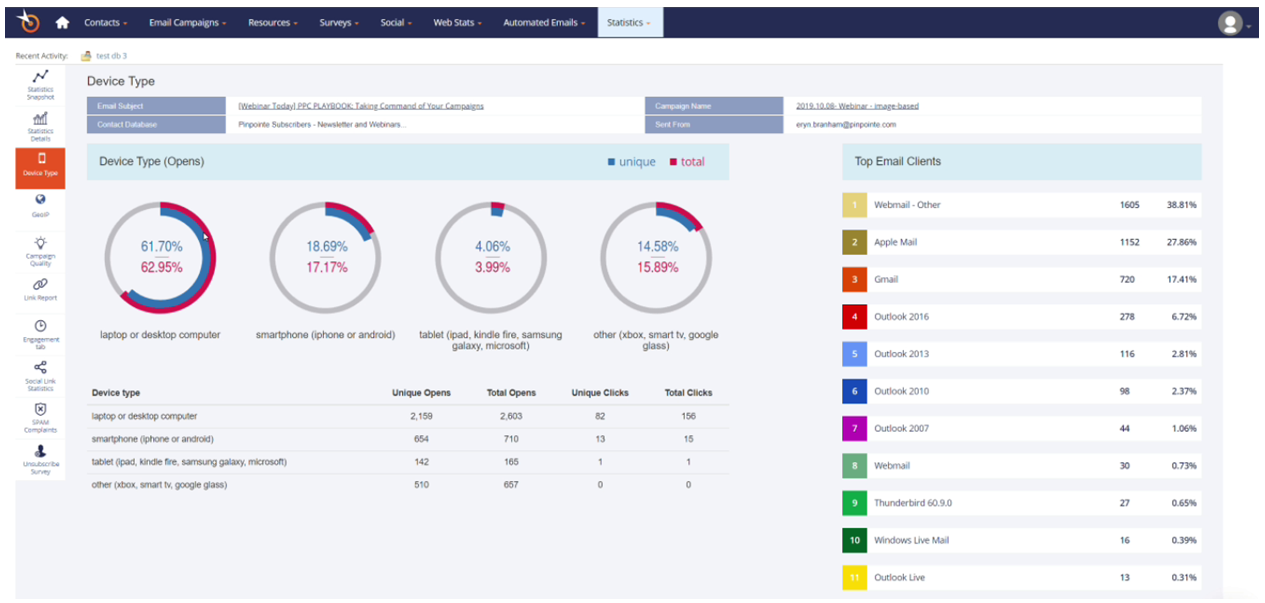
Device Type:
I personally design my webpage, products, and content for mobile devices, and the analytics tool “Device Type” helped me to find out, how many of my audience use mobile devices. No doubt that this function designed to identify the recipient’s device type, and design the email templates according to it.
GeoIP Information:
In the advanced sending options, you can check out the “GeoIP” feature that allows the campaigners to send promotional emails to recipients according to their time zones. Let’s assume that I live in Japan (recipient), and you are sending an email when I am sleeping, then it has lesser chances of a response.
The GeoIP feature allows the campaigners to send promotional emails to recipients according to their time zones, and that increases click to rate.
8) Collect Email Address & Leads using Pinpointe Forms
No need to seek extra support from third-party solutions because you have the ability to collect email addresses and leads from the website using Pinpointe Forms. You can also connect Pinpointe services to third-party solutions such as Mail Chimp, AWeber, etc. Customers can request support team assists in developing and implementing the form on the website.
9) Strong Customer Support Team
Pinpointe strength always had been the support team because they are ready to go the extra mile to fulfill the request of the paying customers. One call or opening a ticket is enough to solve the problem. The dedicated support representatives provide free strategy sessions, free training, data migration (current data and campaigns), and more. I have mentioned above that you can request the Pinpointe developers to step-in and provide assistance in setting up the email address collection form on the website. I have spoken to one of their representatives and I had an excellent demo session.
Bottom Line
I spoke to the Pinpointe customer care and after the call ended I gave them 5 out of 5 stars because they were humble, and listened to the queries. I also loved their support system, where they are coming forward to help someone, who has a customized request. For instance, I asked the customer care to help me add a custom email box on my website and appointed someone from the team to finish it. I loved the packages, customer support, email builder and email sending features. Let us know what you think about the Pinpointe in the comment section below.
Read Full Article Here - Pinpointe Best Email Marketing For Companies | Review
from TechGYD.COM https://ift.tt/3859H7l
Labels: TechGYD.COM
0 Comments:
Post a Comment
Subscribe to Post Comments [Atom]
<< Home