How To Insert a Line In Word | Insert Images, Shapes, Line, Arrows, Tables In MS Word
MS Word is the most popular and used word processor available. It is a word processing software you need to install on your system and then you can create and edit the word document.
You may need to work with documents irrespective of what you do. Whether you are a student or a working person, you may need to use a word processor. Well, what makes MS Word a wonderful and unique word processor is its huge list of features.
With MS Word you can create a beautiful and interactive word document. A document with images, charts, tables is preferred over a simple text document. And to make a document attractive, MS Word offers you such great features.
Must visit: How To Make Your Own GIF Animation

You can include charts in your document, add images, shapes and so on. Adding table is also possible with MS Word. It is not limited to these features as you get SmartArt feature too with MS Word which lets you create beautiful diagrams and figures as per the content. It Also allows you to add effects on shapes, texts, etc. You get several designs for tables, charts and what not. There is a lot which MS Word offers you. So, below are these things features explained including images, table, chart, etc. and how to insert those things in your MS Word document for you.
How To Insert A Line In MS Word
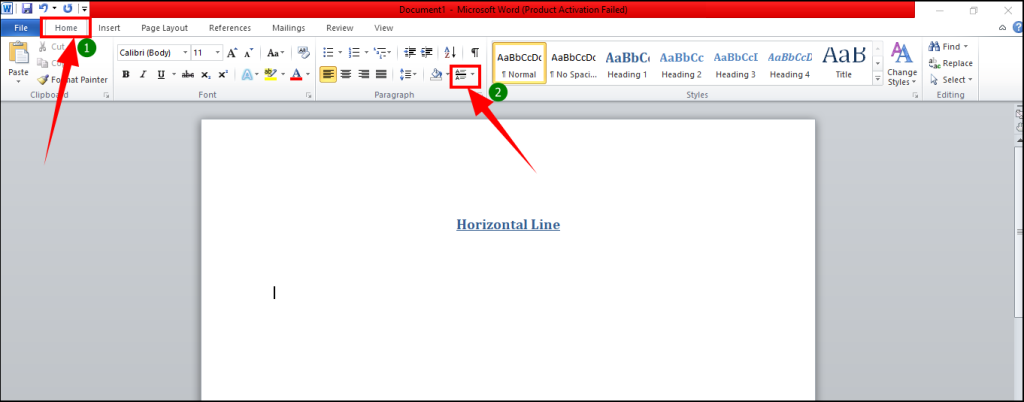
- To insert a line in MS Word, go to the Home section as shown in the image below.
- Now, you have to look for the border button as you can see in the below image.
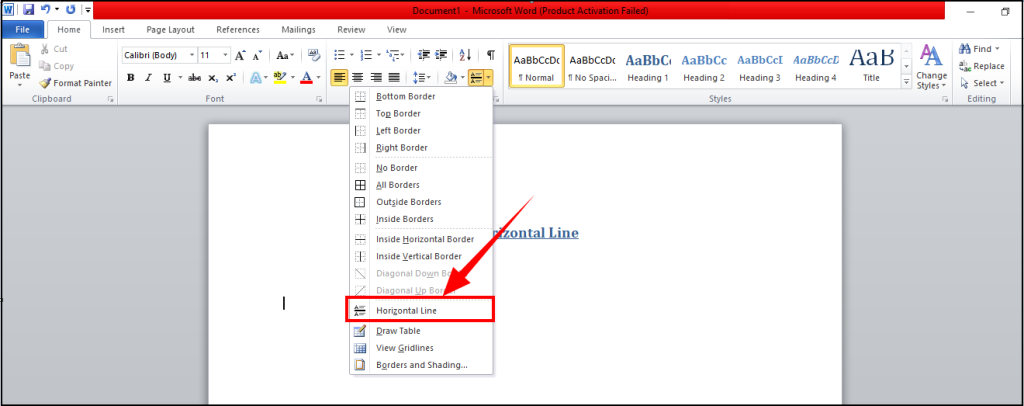
- On clicking the border button, you would get several options to choose from. So, you need to select the Horizontal Line option.
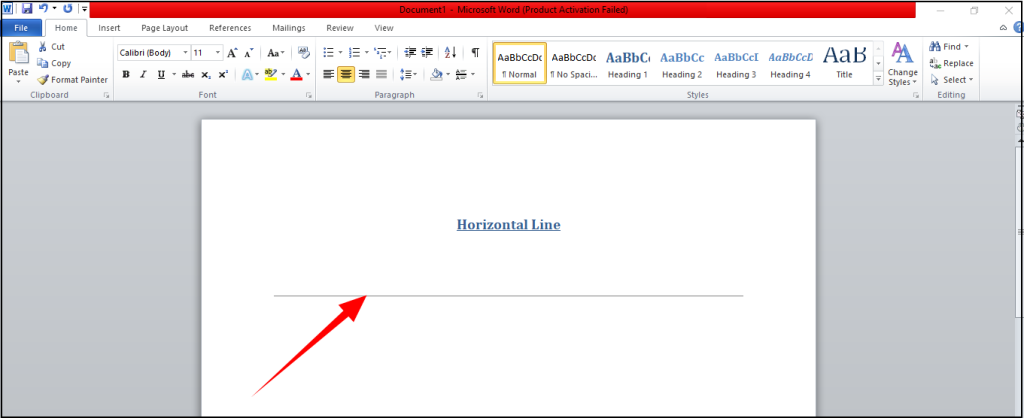
- When you click the horizontal line option, you would see a horizontal line on your page.
 If you want to change the appearance of the line, simply double-click on it and a dialogue box will open there.
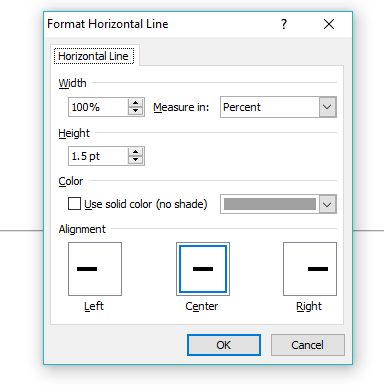
- Here you can adjust the width, height, alignment, and color of the line with ease.
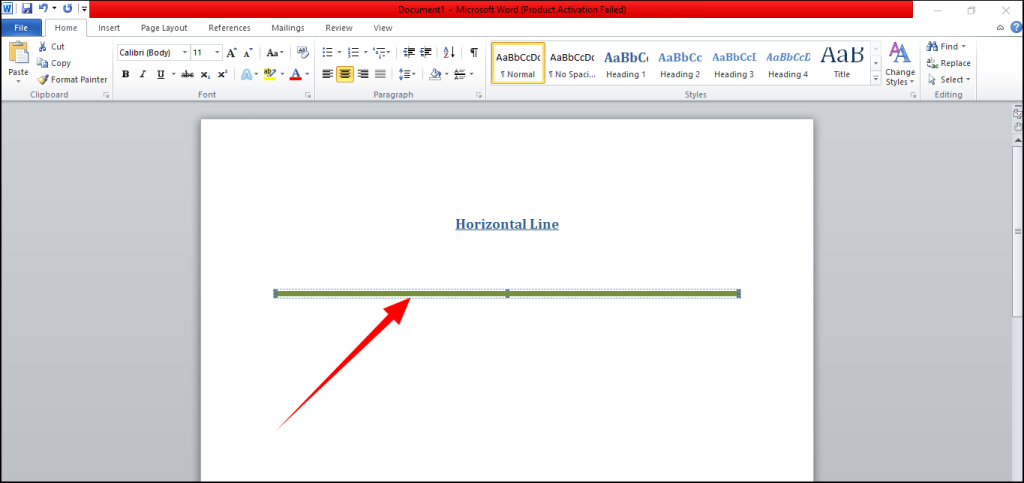
So, this way you can easily insert a line in MS Word.
Latest Excel Tricks To Impress Your Boss At Office
How To Insert Image In MS Word
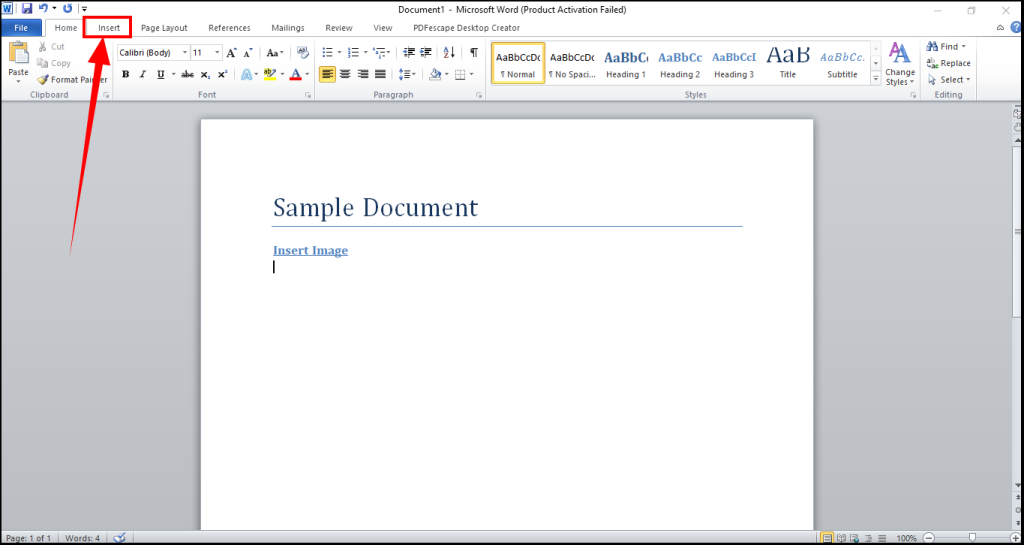
- The very first step to inserting an image in your MS word document is to place your pointer where you want to insert the image. Now you have to click the Insert option as shown in the below image.
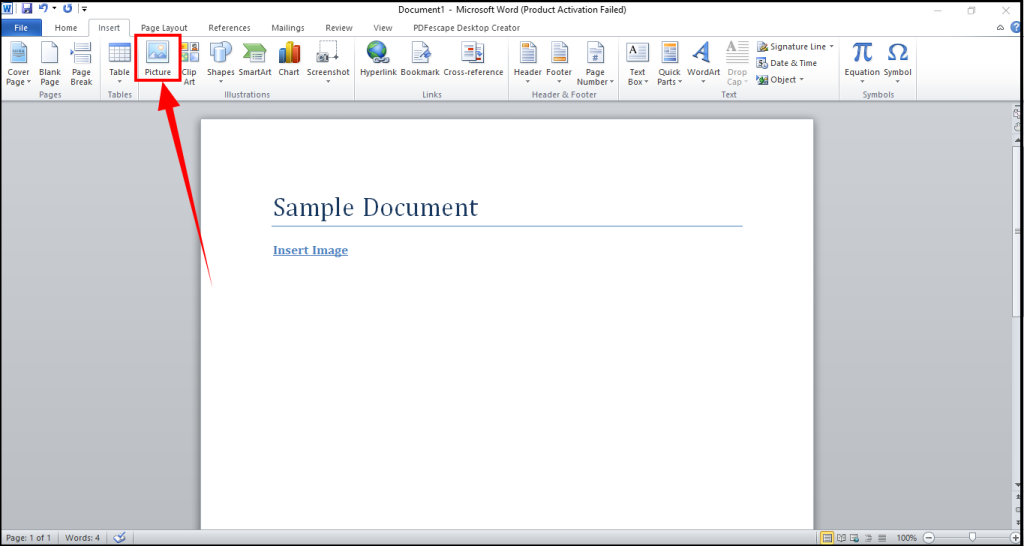
- You will get several options to insert into your document. But you have to select the picture option as you want to insert an image in the MS Word document.
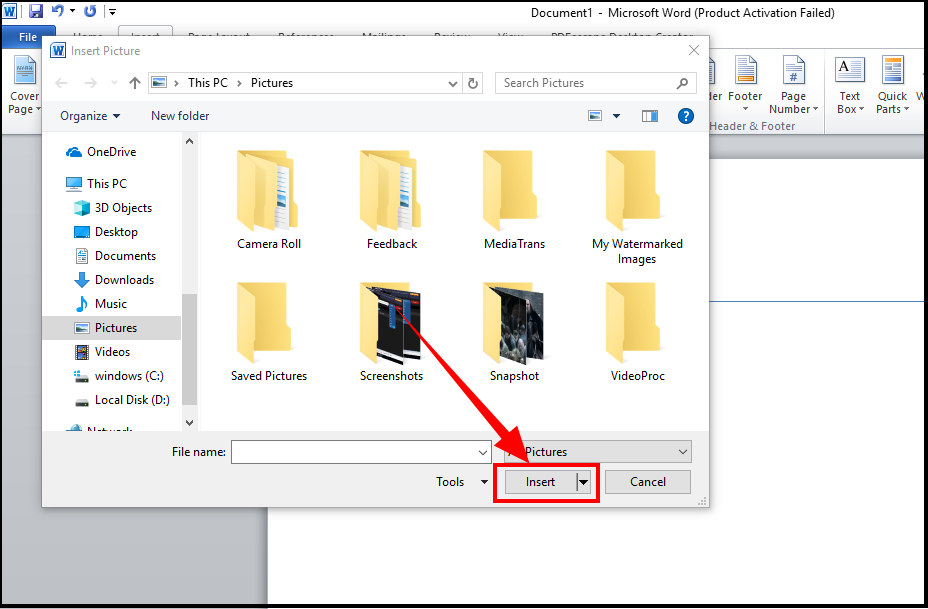
- It will then open the file explorer for you so that you can find and select the image you want to insert into the document. When you find the desired image, simply select the image and hit the insert button.
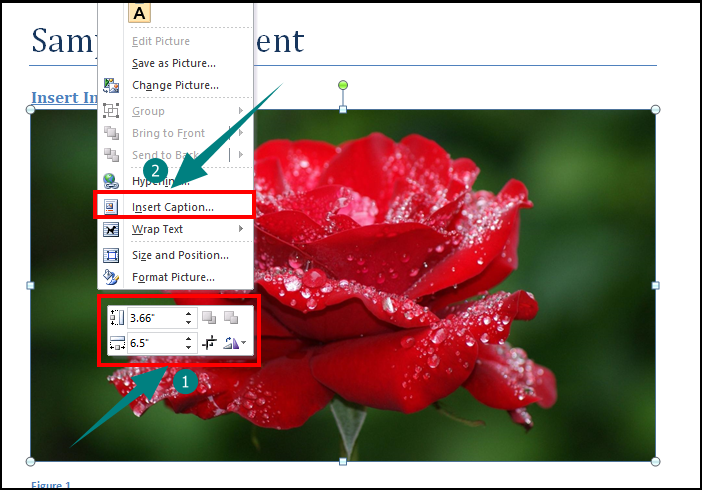
- That’s it, the image will be inserted in that place as soon as you hit the insert button. Now, you can do many more things with the image you inserted. Firstly, MS Word lets you insert the caption for the image. All you have to do is to right-click on the image and then select Insert caption option as shown in the given image. You can even crop, rotate and adjust the size of the image from the given tools.
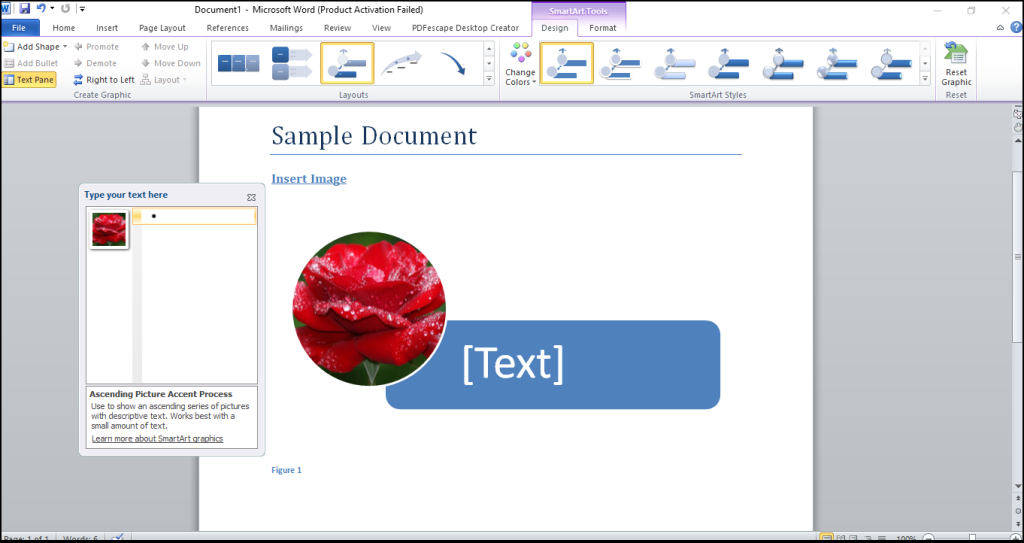
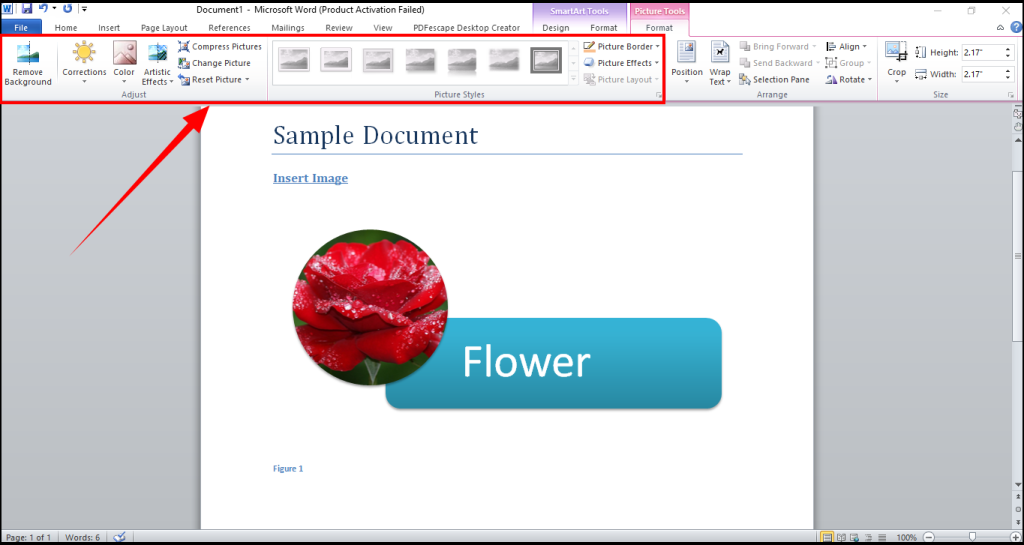
- There is one more interesting feature of MS Word which lets you to add the smart art in your image. For the same, you would have to click on the image and then select the SmartArt tool available at the top menu. You can then choose any design and color it. It will help you make your document innovative and impressive.
Steps To Insert Shapes, Line, Arrows In MS Word
- Another feature which is quite helpful in MS Word and people require them in their document for many purposes are the shapes, arrows, lines, etc. If you also need to draw an arrow or any other shape in your MS Word Document then simply select the insert option.
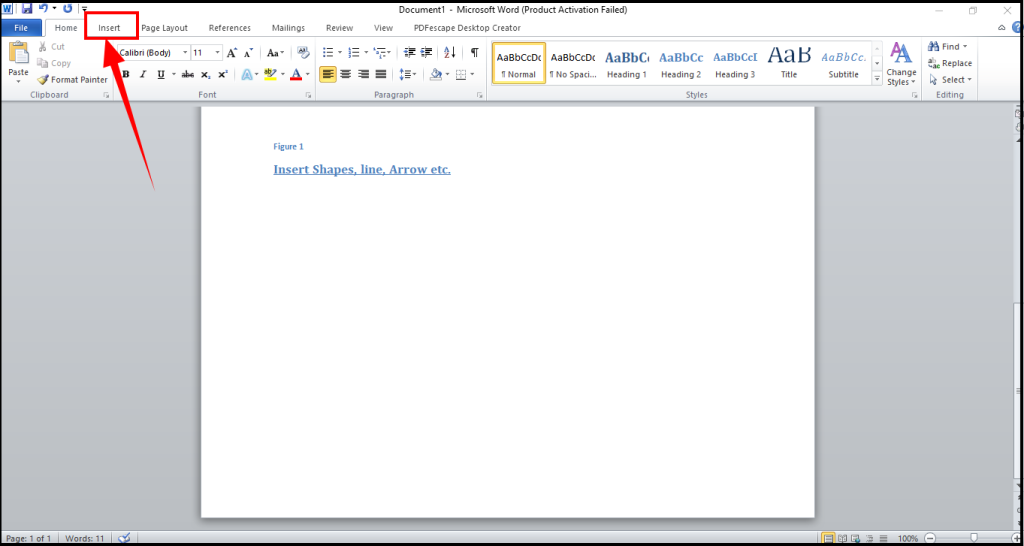
- As this time, you need to insert a shape in the file then you have to select the Shapes option.
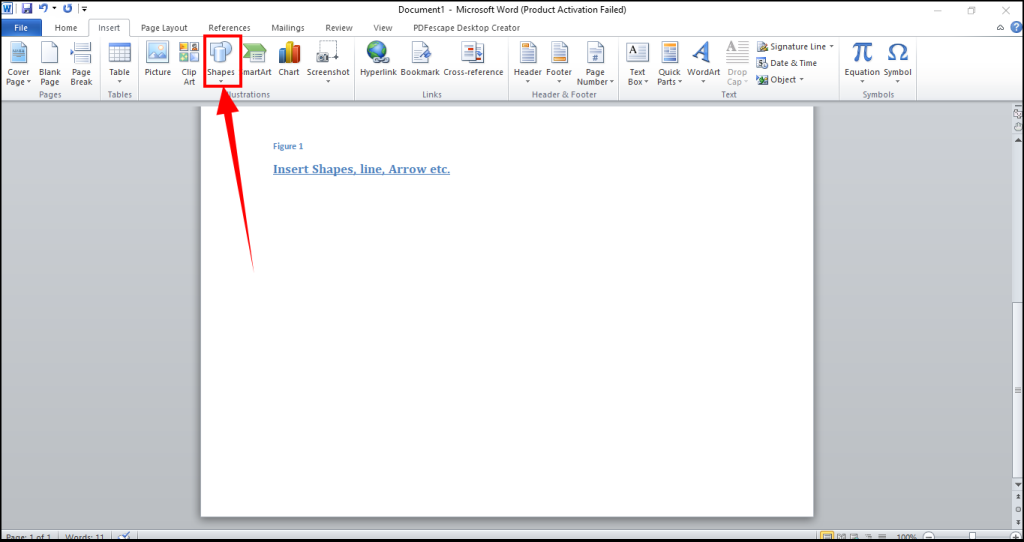
- It will then provide you a lot of shapes you can choose from. Select any shape from the given ones. It also includes line and arrow. So, click on the desired shape.
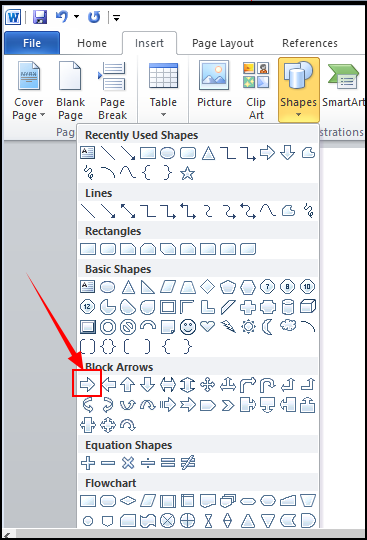
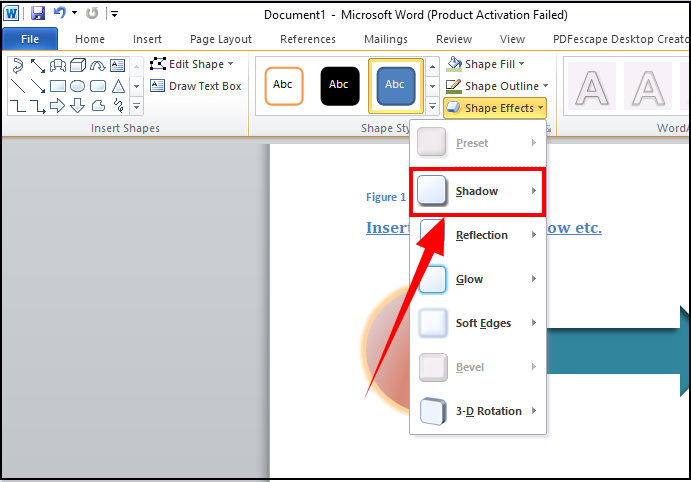
- Now, all you have to do is to click anywhere on the document where you want to insert the shape and drag the mouse to draw the shape. You can draw as big or small as you want. You can also change the size of the shape anytime. Once you have drawn the shape, you can give it desired look. You can add reflection, shadow, change color and so on with the shape. For the same, click on the shape and it would provide you several options. Here, I’m applying show to the shape. For the same, you need to click on the Shape effects option and the select Shadow. You can also choose any other effect like reflection, glow, soft edges and so on. It also lets you apply multiple effects on the shape.
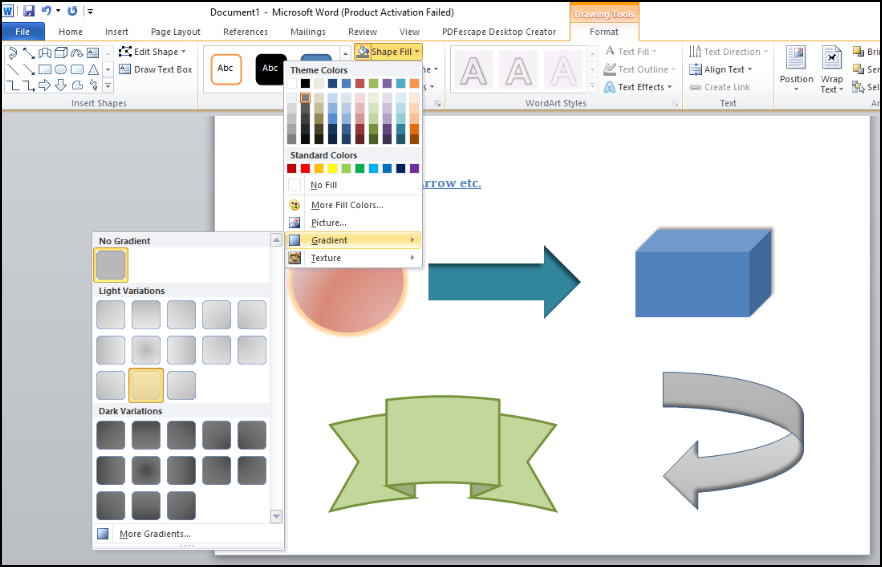
- If you want to change the color of the shape, then there is an option for that too. All you need to do is to click on click on the shape fill option and then choose the desired color. You can also fill the gradient colors. To enhance the gradient colors.
15 Powerful Shortcuts And Functions For Excel Users
Steps To Insert Table In MS Word
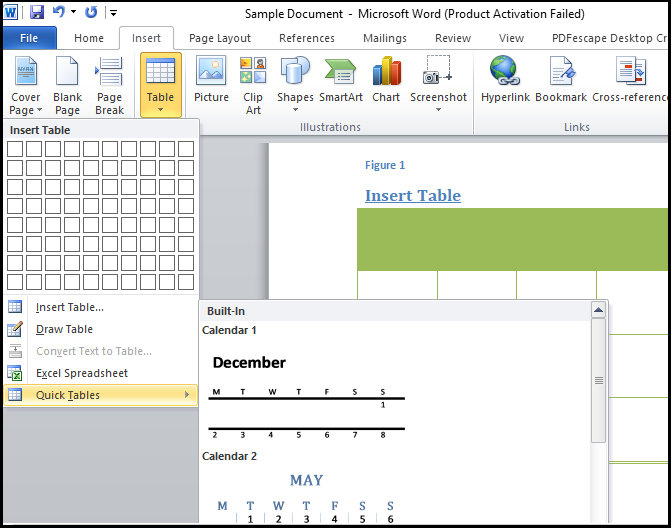
- If you want to insert a table in your MS word document then don’t worry as it is quite easy to insert a table in MS word. You don’t have to do much in order to draw a table in a word document. All you have to do is to go to Insert>>table in MS word.
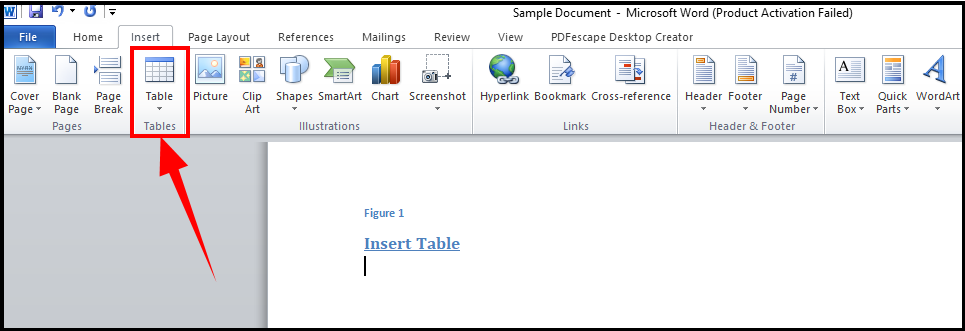
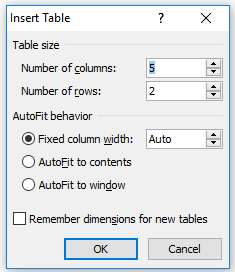
- When you click the table option, a popup box will appear where you would require to mention the number of rows and columns you want in your table. You will also get 3 options to choose from under the AutoFit Behaviour section. So, choose as per your requirements. And hit the OK button. That’s it, your table would be instantly created.
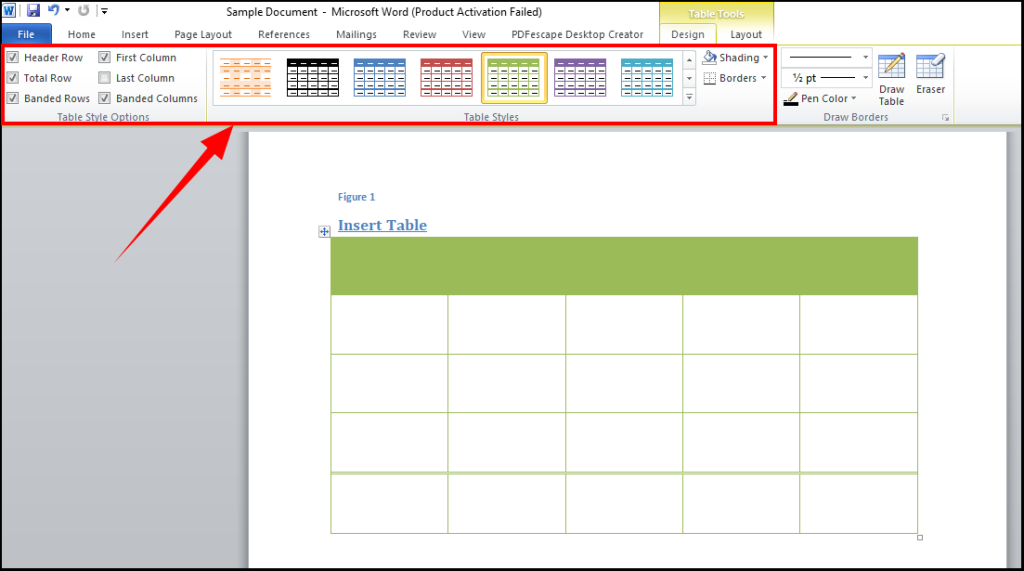
- You can customize your table to make it look even better. It offers you several designs you can opt for your table. So, click on your table and at the top menu, you would find the table tools option. In its design section, you can select any design for the table. It also provides you an option to include/exclude header row, banded-row, total row, first column, and banded column.
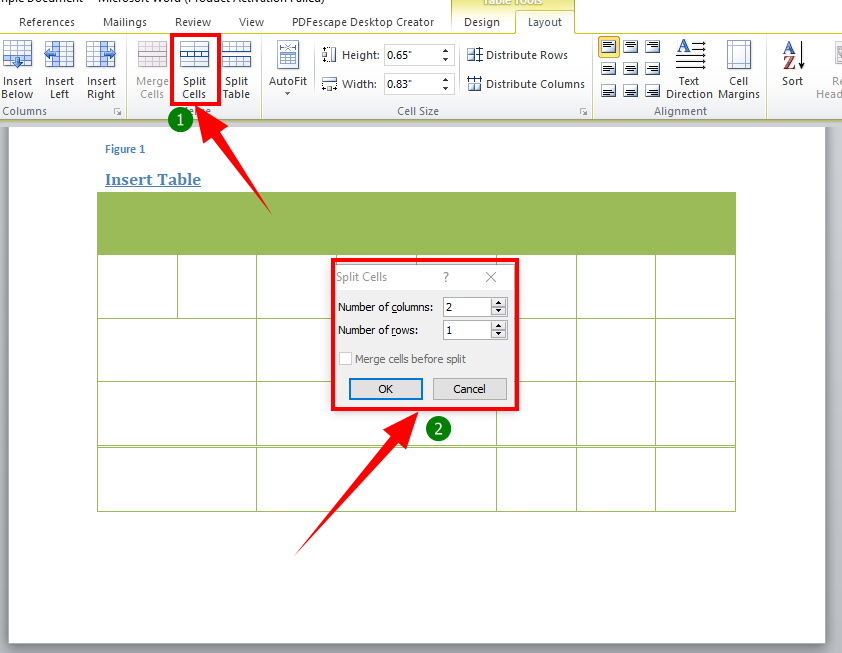
- Now, in the Layout section under Table Tools option, you can customize your table, even more, Here, you can split the table, split cells as I did in my table below, view guidelines, auto fit and so on.
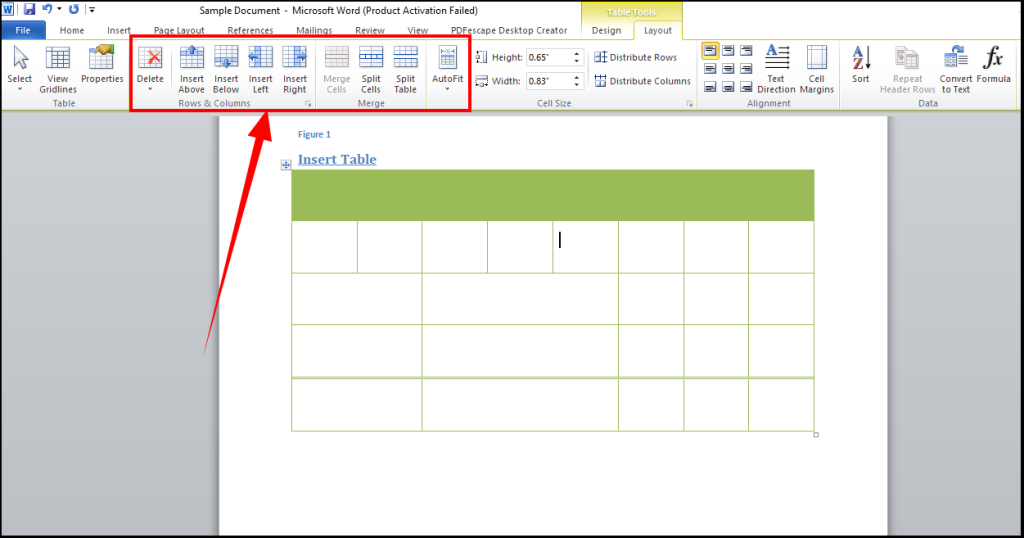
- If you want to split cells, then click on split cells option and it will ask you to specify the number of rows and columns that you want in your selected cell.
- There are some pre-designed tables available. If you want to insert calendar etc. in the document then instead of creating them simply pick up the quick tables.
How To Connect Wireless Printer To Laptop
Steps To Insert Chart In MS Word
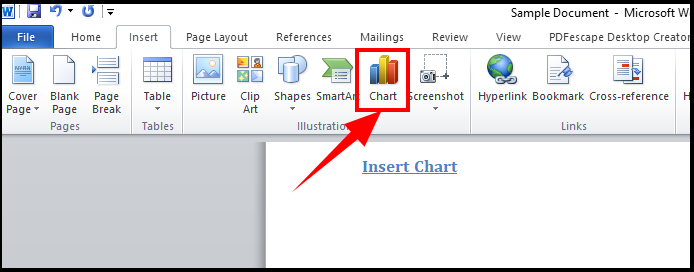
- There is one more thing that you may require in your presentations etc. and that is a chart. With MS word you can easily and quickly insert charts whether bar chart, pie chart, histogram, line, stock, surface, doughnut, bubble and so on. So, for the same, go to Insert>>Chart.
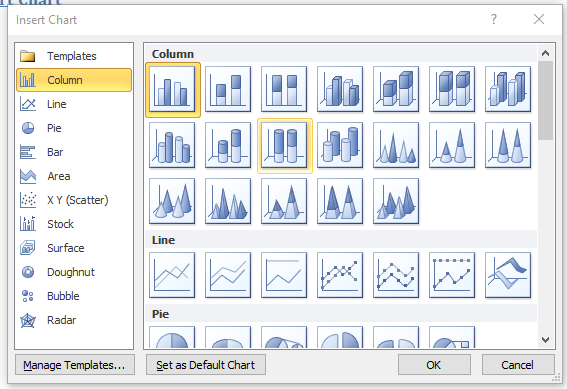
- It will provide you various chart types to choose from. here I’m picking the column chart.
- When you hit the Ok button, it will automatically create the chart with an excel data sheet. You can now change the values of the column as per your need and save it, it would instantly reflect in the chart.
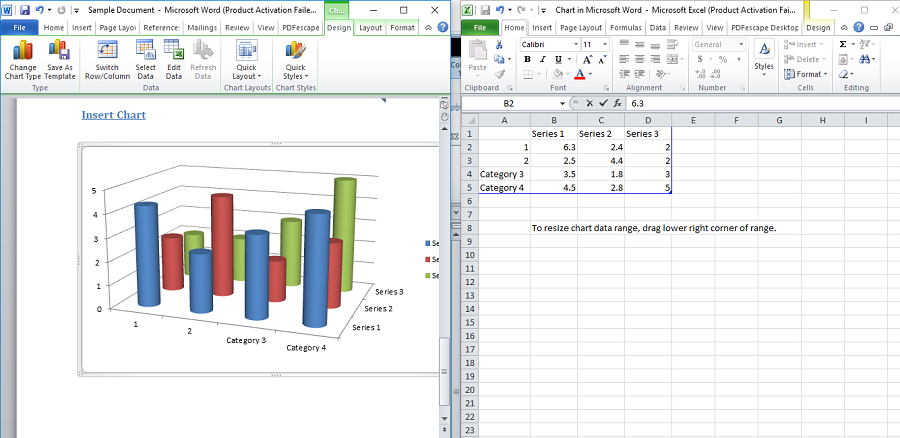
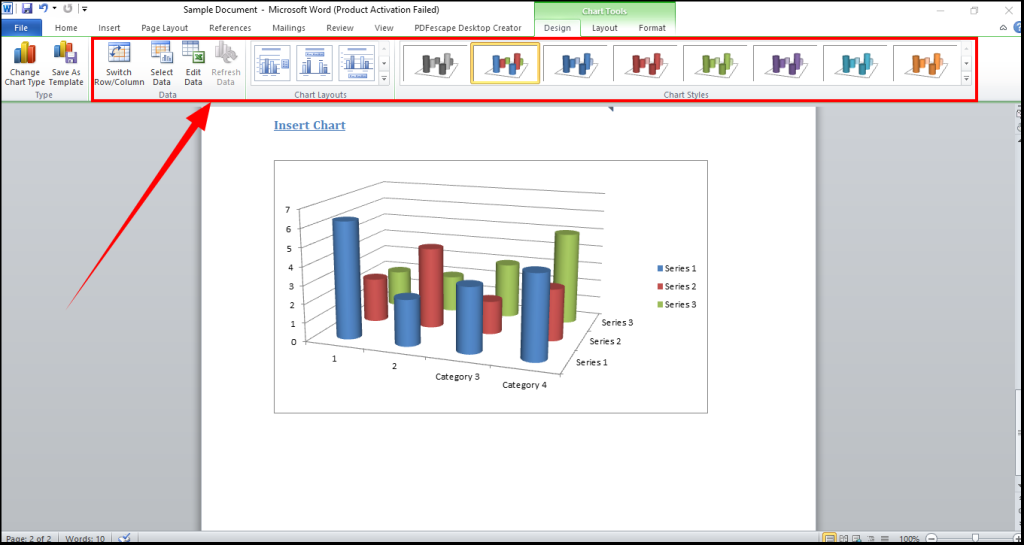
- You also get several options to customize your chart such as its colors scheme, layout and so on.
Steps To Insert SmartArt In MS Word
- One more amazing thing you get in MS Word is SmartArt. It would be quite handy for the presentations. SmartArt can improve the quality of your document instantly by adding a smart and innovative element to it. So, to add or insert SmartArt in your MS Word document, simply click on the insert menu option and then go for SmartArt.

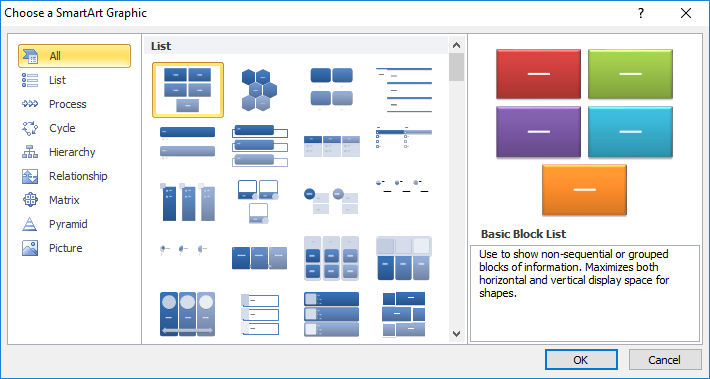
- Here, you would see a really huge list of SmartArts you can pick. If you want to list some things then List SmartArt would do great otherwise there are many SmartArts for other purposes. You can show the process by process SmartArt, and the same way there is a cycle, hierarchy, relationship, matrix, pyramid and picture SmartArt available. Select the one that you would like to insert in your MS Word document and click the Ok button.
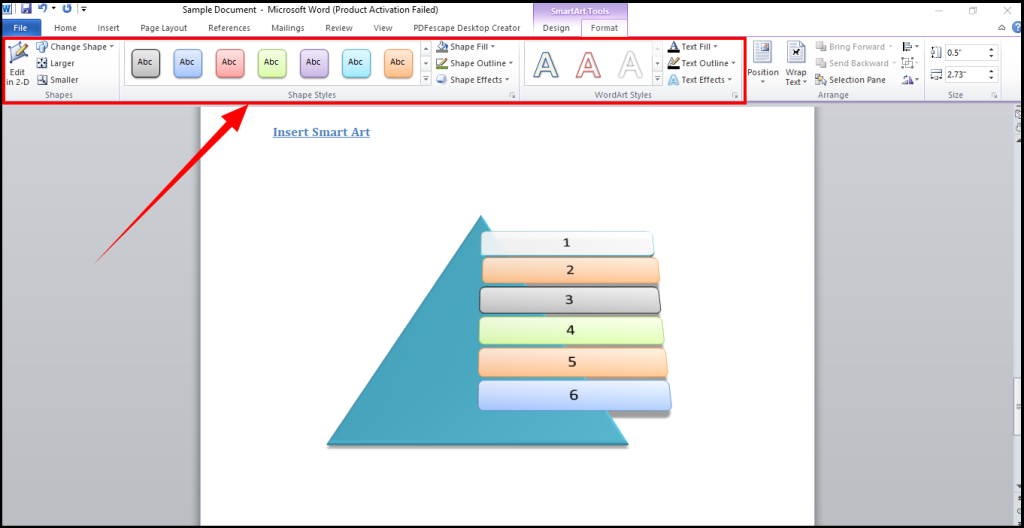
- Here, would get many options you can use to alter the SmartArt as per your need. If you want to change the color of boxes then select the box and then select the color. It also offers several designs. You can also apply the shape effects, text fill, text outline, shape outline, shape fill and so on. So, you get some really good customizing options to make your SmartArt a fancy and attractive one.
So, this was all about inserting tables, images, chart, SmartArt, etc. in MS Word. All the above methods are quite easy to follow. Hope the article was helpful to you. Stay tuned to find some more interesting and informative stuff.
Read Full Article Here - How To Insert a Line In Word | Insert Images, Shapes, Line, Arrows, Tables In MS Word
from TechGYD.COM http://bit.ly/2YMmur9
Labels: TechGYD.COM
0 Comments:
Post a Comment
Subscribe to Post Comments [Atom]
<< Home